


altezzaclub
-
Posts
6830 -
Joined
-
Last visited
-
Days Won
134
Content Type
Profiles
Forums
Events
Gallery
Blogs
Everything posted by altezzaclub
-
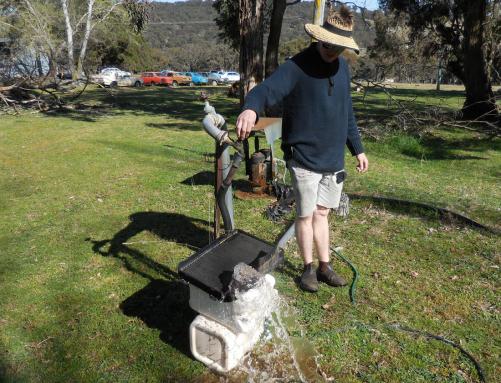
I swapped diffs so the daily, the Girl's Beast, was using the 4.3, and the golden auto had the Celica 4.1. Then came the big job... Steve had his daily, MAO, fitted with a 4AGE smallport, and we had a spare bigport sitting in the Woolshed. Seeing rallying was on hold I figured I'd give this ECU twincam stuff a try and we could use both cars as testbeds for rally ideas. First up was to get both KE70s up to the Woolshed to swap motors around. I was distracted by Steve's MAO not going & rego due. He was chasing a new igniter and I took one up from the wrecker here, but after we had spent an hour or two checking everythng I noticed the motor didn't rock while he was cranking it... no compression.. a minute later, no timing belt!! It had neatly stripped the teeth off the belt at the bottom, and amazingly the 4AGE is not an interference motor! So a new belt and it was away! Seeing rego was due it needed a speedo in the T50, and we found no teeth on the speedo drive either! We grabbed a spare from another box, and I found a third with the cable drive broken. That meant I could combine the two broken ones and hopefully get a working one! Then there was a Nana-style KE70 to sort out and rego, that needed a cooling system flush and hoses replaced for rego. Just plug it up to the bore pump and turn it on. We fired the car up w/o a rad & drove it up against the pump for a block flush. Stacks of filthy shit came out! That car is one of a really nice matching pair he has tucked away in the hangar.. Gramps, the immaculate RT104 Corona had gained the old Celica rally car 18RG. Its own 18RG was hard to start and running poorly so we put a compression gauge over it. Sort of.. 130, 120 120, 0.. ZERO! Steve wouldn't believe it until he held the guage, and that was that! So motor out and swapped for the rally Celica one, and as he dropped the sump off to change them (mid-sump to front-sump Celcia to Corona, blah blah blah..) we found bits of piston ring in the bottom! We still haven't opened it right up to see how bad it is! The rally car motor had an electric pump, and Gramps a mechanical. Naturally the rally car 18RG didn't have a cam to drive the pump, so we bought another pump and made a bracket that slid under the engine mount, using yet another old 18R mount for an insulating rubber! So that was another rego done! Finally, Steve was back at work and I could get into my motors. Hang on, the next distraction was a hand trolley that needed to be converted into an engine trolley, while retaining its original use more or less. These things make moving motors and gearboxes easy for ol' fellas like me!


-
Well, I thought I'd better catch up with the Golden Hoonicorn.. I haven't written anything on it and I've had several trips up and down to the Woolshed in it. A few years back I was travelling North with my bro and saw a lovely gold XX flatfront auto sitting in the main street of Gulgong. As I was leaving a note on it the lady who owned it appeared so we had a chat. Maybe a year later she phones up and says its for sale now. I sent an email to Steve saying a lady had ph'd me with a really nice XX I'd left a note on, and he sends back the same!! He'd seen it on the way back from the Orange Rally and left a note too, and she'd phoned us both! I was off and picked it up the next day. It has little dents in some panels, some half a dozen small rust holes that has been repaired and undercoated only, and a tree branch fell off a truck she was following and landed on the bonnet. It also had new leads, new plugs, new dizzy cap and new fuel pump... and wasn't that keen on starting instantly like the The Girl's Beast does. Someone was chasing a misfire or poor starting before me! After a few months running around the head gasket gave up... no it didn't, it was fine, and someone had changed it recently! Actually, the head was cracked, and I grabbed a spare from the Woolshed, gave the face a sand down with a steel block and fittted it! It ran fine, but it was never as quick to start as the Beast. It was all still a dead stock auto, but I went over the rust patches and did them properly with fibreglass cloth- and an aerosol can of the right colour. It needs a respray as there are tiny spiderwebs of rust under the paint, just like The Beast had when we bought it too, and I have another flatty bonnet to replace the dented one.


-
When it comes to KE70s the boxes are the same inside as Toyota just added 5th gear in the rear tailshaft housing, so it is actually "outside" the gearbox. However the layshaft in the K50 is longer to carry that extra gear, so you would need to use that. The mainshaft probably has extra splines at the rear end to take the other half of the fifth gear, so you need that too. It means you'd only be swapping gears 1-4, which is still a lot of work. I'd need a gearbox shop to do it, and when I put a K50 into them just to have a new front seal fitted they pulled it apart and said "its rooted.. all the hardening has been worn off the layshaft..", and never put the box back together! So you might be opening a real can of worms.
-
Well, this is our family's third (or fourth.. KE70, KE70, Altezza, Pulsar) daily driver. A '92 SSS with badges and wing removed, and freshly painted with aerosol cans after some 4WD rode into the driver's door! I'm not sure if it is the same model SR20 as yours, but I will watch with interest!

-
Yes, you can weld the ears back on the Webers. A mate of Steve's over-tightened one over the soft mount on the Celica rally car & snapped it off, and Steve had it re-welded. Delicate job tho'. Here's the KE70 dimensions we used- Then we made a mockup in random water pipe, and gave that to the local exhaust shop to bend the cage tube. We made the attachments and welded them up. The whole cage is removeable. This is the front half.


-
Yes, the oil pressure may not be enough to keep that lifter pumped up to the correct tappet gap. That's why I wondered if you had an odd tappet gap in one cyl. But that should be an effect of low oil pressure, not a cause.
-
I don't know that filter, but pressure issues would depend on where the sensor is. Assuming the sensor is on the motor side of the filter and release valve, so it reads the actual pressure going around the motor, then when the filter is blocked it will read the pressure from the release valve. There might not be emough flow to keep the pressure up at idle, but its fine when the revs are up. Can you fit an oil pressure gauge to it? If its 5psi below normal all through the range it would likely turn the light on at idle. The Girls KE70 has the light flicker on at hot idle if the revs drop below 1000rpm. Doesn't worry me as there is no stress on the motor at that time.
-
 How clean & tidy do you want them?? Modified for hella sick drifting or stock? Random dents or rust?? Lowered on 16x8s?
 -
Is that just a pair of visegrips and a belt sander to take material off the top surface? or more complicated? ..and if you don't daily it just put a Viton O-ring on each inlet valves and don't use stem seals. The exhausts are always under pressure so don't get oil in, and the O-ring drops the oil onto the top of the valve guide for the inlets. Cars used to have them before these flash new stem seals we use now, but old cars always used to smoke a little.
-
Well, if you decide to weld it up, don't weld the spider teeth to each other. Fill a spider tooth gap with weld, then go to the opposite side and fill the tooth over there with weld. The next spider gears should hit those weld spots at the same time. What you are doing is making it impossible for the spider gears to do a full circle, but they can go around part of it. This give you some difference in the turning circle of the front wheels so the car does turn in a little before the wheels lock together. If you weld the teeth of the spider gears together the wheels are locked together in rotation and the car will want to understeer everywhere. Seeing FWD understeer anyway, it will end up a pig to drive! Drive someone else's FWD with a locked diff before you do it. I wouldn't lock it myself, I expect it will ruin the handling even moreso than a RWD. Front tyres... gone by lunchtime!
-
Wouldn't a lifter problem give you an odd tappet gap?? Easy enough to check. Can you push the lifter pistons down against the oil in a 5K?? In my old Armstrong Siddeley you pushed the pushrods right down by levering on the rocker with a big screwdriver, and set the tappet gap to 90thou. When you started it it rattled for a minute then settled down. Any jammed lifter showed up staight away. For bearings you could take the bonnet off, lift the motor and drop the sump for a look. Pain in the arse job, but a little quicker than pulling the whole motor out and stripping it.
-
hey that's pretty cute! ...but somehow too clean & tidy to be real... He'd cream himself if I took him around the Woolshed! Doors, gates and car parts in a thousand artistic arrangements!
-
1983 Ae71 Sport Coupe - Aka Surreptitious
altezzaclub replied to oldeskewltoy's topic in Rollaclub Rides
Arrrgh! You're driving on the wrong side of the road! We're all gonna die! Sounds good all right- -
Run it further back until it just covers the front edge of the bell-housing. That way it you ever need it, the rock you are sliding over won't pop up after the cross-member into that gap and smash the bottom off the bellhousing. It will need to have a bend in it, as it slopes down from front radiator crossmember to main engine crossmember then goes horizontal to overlap the bellhousing. Bolt it on under the rad and to the engine crossmember, leave it free at the back.
-
1983 Ae71 Sport Coupe - Aka Surreptitious
altezzaclub replied to oldeskewltoy's topic in Rollaclub Rides
3.9 is still tall... I suppose you've worked out the rpm you'll be pulling most of the time, but a 4.1 is pretty common here, 4.3 for around town, and Steve runs a 4.8 in his 4AGE road car. -
Check that the adjusting rod is screwed right back in Rusty. You'll have to hold the ratchet just out of place to turn the threaded rod "backwards". Discs are fine except for the pathetic handbrake that comes with them, a couple of handbrake turns and its all over... and the chance of welding the caliper mount on just slightly offline and having the pads wear crooked forever after. Of course you then have TWO sets of rear brakes to fix, the discs and the handbrake drums, unless you get the funny "handbrake included in disc caliper" ones where the handbrake jams on and you can't drive away. I've got a Celica set sitting waiting for enough time to mount them.
-
Don't forget to put the forward-facing diagonal struts in, the ones in your drawings but not on the stands yet. Make a bolt-on hoizontal from one stand to the other, right under the car. That will take tremendous stress off the verticals of the stands when you move the car around. The thing that will collapse a stand and drop the car will hardly be seen. A little bit of gravel against a wheel, a hole in the concrete, a 10mm nut you didn't notice...
-
The m'cyl does go back into the booster a way, so you will have to do some careful measuring. I think the shaft sits just back inside the booster and the m'cyl piston goes in 5 or 10mm. First make sure the pedal moves correctly and the booster shaft does the same. Touch the pedal and the shaft should move out of the booster with it. Then work out the gap between the booster shaft and the m'cyl piston. Even some bluetac or plastosine on the back of the piston should show you the gap when its assembled. . If you have the m'cyl bolted on and you undo a brake line a little, one person can carefully push the brake pedal by hand and the other person can watch for when fluid leaks out of the m'cyl connection as the pistons move. That will also tell you how far the pedal moves before the m'cyl does anything, which is a measure of the gap. If the gap is a couple of mm and the brakes don't work, check the bleeding again. As soon as that pedal pushes the rod into the booster it should push brake fluid out a nipple.
- 8 replies
-
- 1
-

-
- Master cylinderbrake booster
- brakes
- (and 1 more)
-
Straight swap if you have a 4speed in there! Everything fits, its a simple and nice piece of engineering from Toyota, all they did was lengthen the layshaft and stick an extra gear in the tailshaft housing. Check for leaks from the front seal. The rear seal is 10minutes to change, but the front seal needs the gearbox stripping from the back! That is an abysmal piece of engineering from Toyota!
-
OK, so the handbrake only comes up a couple of notches and locks up solid?? and the shoes just scrape when you turn the wheels on a jack?? Just check that again now to make sure... That will tell you if the rear shoes are adjusted right. The fronts are self-adjusting, as they're discs, so THAT means any problems are in the master cyl. First, lie under the dash & check the pedal and see what is happening when you pull it all the way back up. Does it pull the shaft back out of the booster?? Why is there slack and free-play between the pedal and the booster?? Is the pin in correctly?? Is the spring on where it should be?? Now, the internal master cyl springs should push the pistons back, and the pedal spring should lift the pedal up. Take the master cyl off and look inside the back of it. The piston should be right back against the circlip. Check how far the adjustable shaft sticking out of the booster comes. This is what pushes the master cyl pistons forward, and if that shaft doesn't sit just behind the pistons the pedal will go down and the master cyl won't move. If it sticks out too far the brakes will go on but not come off. Not your problem, but I had that once and hence I learnt about it. Adjust the adjustable shaft until it pushes the piston forward when you fit the master cyl onto the booster by hand, then screw it back in until it doesn't quite touch the m'cyl piston. This thing- http://www.supermoto...ter-pushrod.jpg The booster is working as it does suck the pedal down. It stalls the car at idle because every time you push the pedal it lets air into the inlet manifold and leans out the mixture. Either you have the wrong m'cyl, or it is not setup correctly, or you haven't bled all the air out. Bleeding- If there are bleed nipples on the m'cyl you bleed them first. Mine doesn't have any, but I don't know what m'cyl you bought. Two-man job.. Open the bleed nipple, mate pushes the pedal down and holds it down, you close the nipple, he lets the pedal up. Repeat a couple of times. When the m'cyl is done, go to the nearest wheel. Loosen the bleed nipple and do it up just enough so its easy to open again. He pumps the pedal up and down 4 or 5 times and holds it down. You open the bleed nipple then close it, then he lets the pedal up. Repeat a few times until no bubbles come out. Do each wheel in turn. If the brake fluid is clean like you say and you have a clean tin to catch it in, I'd re-use it. I used to run a garage in Wynberg, long before your time I'm sure, but I still have a mate there that used to work for me. He became a paneelklopper but will know mechanics of cheap & dodgy persuasions should you get desperate. Replacing the booster is shit-easy and you don't take out the pedal box... not your problem anyway, brakes would be fine but hard to press if the booser was crook. haha! Goffels my man! Airfares to Jo'burg are 50% off this week... fly me over & I'll fix it!
- 8 replies
-
- 1
-
-
- Master cylinderbrake booster
- brakes
- (and 1 more)
-
One test would be to put your foot on the brakes and hold it there while you start the car. The booster should suck the pedal down under your foot, & if it doesn't the diaphram is not working. Did you manually adjust the rear shoes up until they just drag on the drums, then pump the pedal a few times to re-center them and then re-check them. While the KE70 has self-adjusting shoes you need to set them up manually first, a pain in the arse job. Don't forget the ratchet mechanism only works in one direction, pushing the shoes outwards. Having the brake pedal halfway up means you should look carefully at the old cylinder and the new one. There is something odd there, a distance to a rod or piston or something strange. Maybe the booster is jammed halfway down, maybe the master cyl is faulty and the pistons are not coming right back... Did you change anything at the pedal?? Did you take the booster out? What was wrong with the system when you took it all apart?? More than just the leaking master cyl??
- 8 replies
-
- 1
-
-
- Master cylinderbrake booster
- brakes
- (and 1 more)
-
That fuel line is cool! I can use a small surge as a motor making 100KW uses about 0.75L/min of fuel, looking at an engineering website for just that. Seeing we're making a fair bit less with the 4AGE I reckon I'll get 20seconds out of the surge tank, and not many high-G corners take 20sec to go around. The hotrod site I looked a said a motor on what uses 0.25Kg/hr/BHP, and that comes out to about 0.5L/min. The SR20 will no doubt use more, but probably oil surge will kill them both before fuel starvation... I can't find much about fuel flow through steel pipe of various diameters, or pumping rate of the VL lift pump. The real information is often not on the web. What radiator are you planning on using Jason? Will an N14 or N15 one fit?
-
The N14SSS has an SR20 fed by 8mm OD line, and the same for the return. The KE70 runs 5mm. I think the Pulsar has an in-tank pressure pump, the line goes straight into the filter at the motor end and there's no sign of a pump back at the tank. I'm doing the 4AGE/KE70 now & I plan to use the KE70 lines. I'll try using the VL lift pump to fill a surge tank at the front and feed the VL pressure pump from that. The surge tank is a random (Subaru) fuel filter I picked up with the filter media removed and a couple of outlets added. I'm waiting on the welder to weld the can back to the lid. It holds over 200ml. If I'd been clever enough to search for an in-tank pump in the 1000 cars at the wreckers I'd have used that. Never thought of it.


-
Just shoot it off to an engineering shop. Have it cleaned then bore measured, crank measured, checked for straight etc. Then you'll know what you need to find.. oversized pistons, undersized bearings. Get it bored and crank ground back. Have them balance it all when you've got some cash. If you have accurate scales at home (down to 1gm or less) or find some on Ebay you can get all the pistons the same weight, same for rods, then let them spin it for harmonic balancing.
-
That sounds a good idea- Read through The Girls KE70 to see what I did. Straightforward and simple, it gives a nice quick and fun car. I've just put the performance parts into another KE70 as The Girls is getting a 4AGE. Decide what cam you want, and don't go too rediculous if you're going to drive it on the road. Race cams are for race cars! Sort out a Weber carb, the 32/36 d'draught is cheap, the single DCOE more costly. Both will need jetting to suit the motor. Hurricane extractors (the blue 4-into-1) are about $200 new, and fit a 2" into inch & 3/4 exhaust system. You should get the whole motor stripped & dipped to clean the rust out of the block, and then balance the crank and pistons/rods. Have them machine the flywheel from 8kg down to 6kg, it all helps. You can port the head out yourself and grind the valves. Have about 15-20thou skimmed off it for a bit more compression. The electronic dizzy is a great idea too. Hit the wreckers for an electric fan, and fit a 90-85deg switch to turn it on with a manual switch over-ride on the dash. It makes the motor quieter and give a few more bhp to the wheels. If the bores are pretty worn then rebore bigger. Stock bore is 75mm, the 5K 1500cc pistons are 80.5. Of you can find some other piston in between it will help with more torque, so spend a few hours chasing catalogues. Read a few builds on here, some guys have done very clever things!


